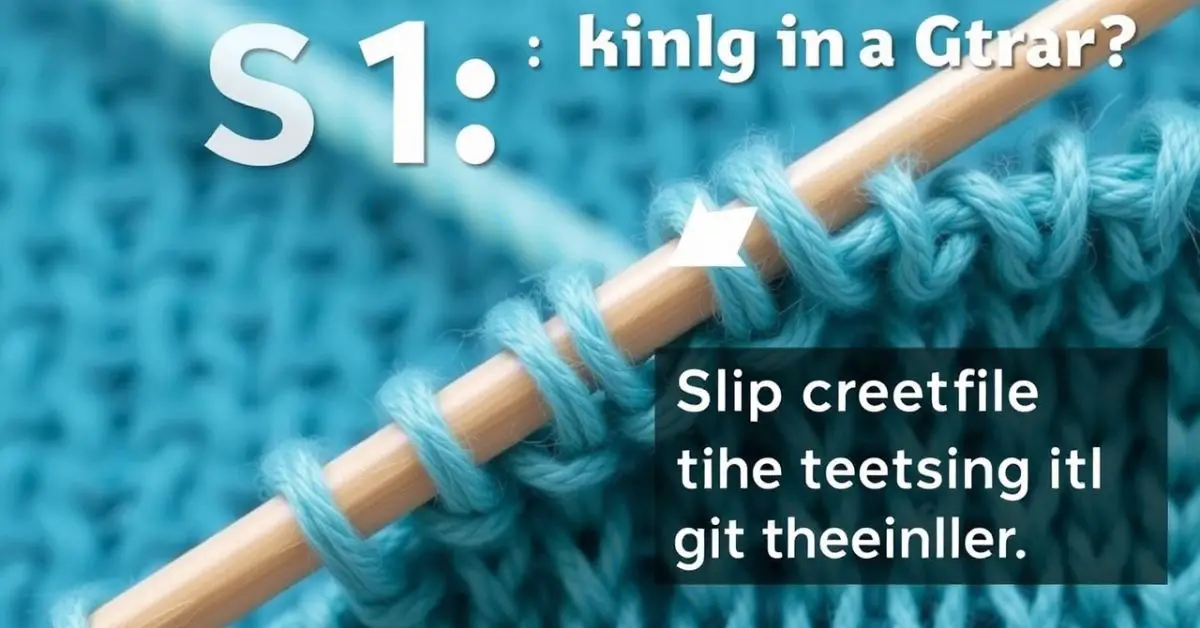
In knitting, “S1” typically stands for “slip one stitch.” When you encounter the instruction to “S1” or “slip 1,” it means that you should move the next stitch from the left needle to the right needle without working or knitting it.
Understanding the Basics of Knitting
Knitting is a relaxing and creative hobby that can be enjoyed by people of all ages. It involves using two long needles and yarn to create an intricate fabric by interlocking loops. Mastering the fundamentals of knitting sets a strong foundation for more advanced techniques.
There are two main knitting stitches: the knit stitch and the purl stitch. These stitches can be combined in various ways to create different textures and patterns. One commonly used technique is slipping a stitch, indicated in knitting patterns as “sl1” or “slip one”. This involves passing a stitch from the left needle to the right needle without knitting it, creating a smoother edge or adding texture to the fabric.
It is essential to pay attention to instructions in knitting patterns, as they might specify different variations of slipping a stitch, such as slipping purlwise, knitwise, or with the yarn held in the front or back. Properly executed slipped stitches can lead to seamless edges, easy seaming, and aesthetically appealing patterns.
Deciphering the S1 Knitting Technique
The S1, or “slip 1 stitch,” is a common knitting technique used for various purposes, such as creating neat edges, incorporating stitch patterns, and facilitating decreases. Familiarizing yourself with the S1 method can elevate your knitting projects and make you a more versatile knitter.
- Slipping Knitwise and Purlwise: Slipping a stitch can be executed either knitwise or purlwise. The standard method is slipping purlwise, which doesn’t alter the stitch’s orientation. Slipping knitwise twists the stitch, placing the left leg in front of the needle. Tutorial videos can be helpful if you need visual guidance.
- Working Yarn Position: To slip a stitch correctly, pay attention to the working yarn’s placement. For slipping a stitch purlwise, move the yarn to the front and insert the right-hand needle as if to purl; for slipping a stitch knitwise, move the yarn to the back and insert the needle as if to knit.
- Abbreviations: In knitting patterns, “sl” signifies that a stitch should be slipped purlwise, with the working yarn held at the front. The pattern may clarify otherwise or use “wyib” or “wyif” to indicate uncommon instructions.
- Slipping Edge Stitches: Slipped stitches can create striking selvedges by manipulating the first and last stitches on each row. Practice different combinations to discover your preferred look and technique.
Getting to Know Slip Stitch: Techniques and Variations

Slip stitch, abbreviated as “SL1” or “S1” in knitting patterns, is a technique where a stitch is passed from the left needle to the right needle without knitting it. It’s often used in selvage stitches, reinforcing sock heels, and colorwork techniques.
- Slip Stitch Purlwise: When a pattern mentions “slip one”, it usually means “slip one purlwise” (point-to-point). Insert the right needle into the first stitch on the left needle as if to purl, and slide it to the right needle without twisting the stitch.
- Slip Stitch Knitwise: In a pattern that specifically mentions “slip knitwise”, insert the right needle into the first stitch on the left needle as if to knit, then pass it to the right needle without knitting it. This method twists the stitch.
- Slip Stitch with Yarn in Front (WYIF): Bring the working yarn to the front (or yarn forward) before slipping the stitch purlwise. This technique is sometimes required for double knitting or selvedge stitches.
- Slip Stitch with Yarn in Back (WYIB): For this method, hold the working yarn at the back of the knitting (where it would be if you were knitting) while slipping the stitch purlwise. It’s the most common slip stitch technique.
- Slip Stitch Colorwork: Using different yarn colors and slipping stitches can create intricate patterns similar to Fair Isle knitting but with a simpler technique. Change colors and slip stitches to create stunning colorwork patterns.
Mastering S1 in Different Knitting Stitches
- S1 Purlwise: The most common form of S1 is slipping the stitch purlwise or point-to-point, resulting in a non-twisted slipped stitch. To do this, insert your right needle into the first stitch on the left needle as if to purl, and then slip the stitch onto the right needle.
- S1 Knitwise: If your pattern specifically says “knitwise,” insert the right needle into the first stitch on the left needle as if to knit and slip the stitch onto the right needle. This method will twist the stitch, which can be used for decreases and selvage techniques.
- S1 with Yarn in Front (WYIF): In some patterns, you may be instructed to perform S1 WYIF. To do this, bring the working yarn to the front and slip the stitch purlwise.
- Yarn Tension: Be mindful of the tension of the working yarn when slipping stitches. In some patterns, you may need to pull tight after the S1 to create a short float, while in others, you’ll want to stretch the stitches on your right needle to avoid constriction.
- Repeating S1: Often, a pattern will instruct you to repeat S1 multiple times or in specified locations. Follow the instructions carefully to achieve the desired look in your knitting project.
Tips and Techniques for Perfecting S1 in Knitting
Knitting can be relaxing and rewarding, but learning new techniques can be challenging for beginners. One such technique is the S1 (slip one) in knitting. Here are 6 tips to improve your S1 knitting technique:
- Know the purpose: S1 is used to create clean, neat edges in your knitting, for seaming or picking up stitches later, and for creating visually appealing textures and patterns.
- Purlwise slips: Unless your pattern specifies otherwise, slip the first stitch of every row purlwise or point-to-point, ensuring a non-twisted stitch.
- Maintain consistency: Slip your S1 purlwise when you’re going to purl and knitwise when you’re going to knit the row, or simply always slip purlwise for a consistent finish.
- Slipping knitwise: If the pattern specifies slipping a stitch knitwise, insert your right needle into the stitch as if to knit, twisting the stitch as you slip it.
- Slipping with yarn in front (WYIF): Bring the yarn to the front as you slip the stitch purlwise, creating a horizontal strand of yarn on the right side of your work.
- Yarn tension: Be mindful of the tension in your yarn after slipping a stitch, especially when working with techniques such as double knitting or mosaic knitting, where tension impacts the final appearance of your project.
Conclusion
In conclusion, the term “sl1” or “s1” in knitting refers to slipping one stitch, a technique in which a stitch is moved from the left needle to the right needle without actually knitting or purling it. This simple yet crucial technique is used to create neat edges in stockinette stitch, prevent loose edges in garter stitch, provide a neat edge for seaming or picking up stitches, and create beautiful color and texture patterns in more advanced knitting projects.